java 自定义注解器,提交私仓 maven
1. java 自定义注解器
1.1 注解器作用
通过元注解对类、变量等进行标记,在代码编译期通过解析器 AbstractProcessor 进行解析,快速实现模板代码的构建等作用
1.2 自定义注解
通过 @interface 实现注解,如:
1
2
3
4
5
| @Target(ElementType.TYPE)
@Retention(RetentionPolicy.CLASS)
public @interface MapType {
String name() default "";
}
|
1.3 实现一个解析器 Processor
- 必须继承
AbstractProcessor,通过方法 public boolean process(Set<? extends TypeElement> annotations, RoundEnvironment roundEnv) 对定义的注解类型进行解析。
- 需要重写
getSupportedAnnotationTypes() 声明对哪些些注解生效
- 在
init(ProcessingEnvironment processingEnv) 中获取工具类,如:1
2
3
4
5
6
7
8
| @Override
public synchronized void init(ProcessingEnvironment processingEnv) {
super.init(processingEnv);
Types typeUtils = processingEnv.getTypeUtils();
Elements elementUtils = processingEnv.getElementUtils();
Filter filer = processingEnv.getFiler();
Messager messager = processingEnv.getMessager();
}
|
1.4 解析注解,构建类
从自定义解析器可以获取并处理自定义注解类型,动态构建类可以通过 JavaWriter 或者 JavaPoet。
JavaPoet 是对 JavaWriter 的进一步封装。
如何使用参考官网介绍:
JavaPoet github 链接
2. 实现注解库
新建 java library,建议使用 idea 的 maven/gradle 工程
2.1 mapper-annotation 注解库
新建 java library,命名为 mapper-annotation,用于存放注解。
也可以把注解、解析器等放在同一个库中,但一般解析器所依赖的库只需要在编译期使用,不需要打包进主工程,所以会选择库拆分。
2.2 mapper-compiler 解析库
同样新建 java library,再添加 JavaPoet 依赖,在 module 的 build.gradle 中添加 implementation group: 'com.squareup', name: 'javapoet', version: '1.8.0'
在项目调试阶段,增加注解库依赖 implementation project(":mapper-annotation"),在调试完成后,可以将直接依赖替换为线上依赖,如 implementation 'com.lib:mapper-annotation:1.0.0'
2.3 mapper aar 库
这个库主要是存放对外访问的接口。给 android 项目使用,如果没有这类需求可以不加,或者也可以放入 annotation 库中,不是必要创建的库。
新建 android library,同样需要添加对 annotation 依赖,在上线后替换为线上版本,如上。
3. 自定义 mapper 注解库需求及实现
3.1 构建需求
在业务项目中使用了大量的组件,在使用中需要根据用户的组件类型去匹配,呈现该组件。在原先开发中,流程如下:
1
2
3
4
5
6
7
8
9
10
11
12
13
14
15
| private void showComponent(Item item){
String type = item.getType();
if("A".equals(type){
Component cc = new A(item);
cc.show();
}else if("B".equals(type){
Component cc = new B(item);
cc.show();
}else if("C".equals(type){
Component cc = new C(item);
cc.show();
}else {
//...
}
}
|
在少量组件的情况下,使用 if-else 结构清晰,但随着项目扩展,这段判断特别长,因此有了第一次改造,修改后如下:
1
2
3
4
5
6
7
8
9
10
11
12
13
14
15
16
17
18
19
20
| private static HashMap<Strng,Class> map = new HashMap<>();
static{
map.put("A",A.class);
map.put("B",B.class);
map.put("C",C.class);
//...
}
private void showComponent(Item item){
Class clz = map.get(item.getType());
if(clz!=null){
try{
Component cc = clz.getConstructor(Item.class).newInstance(item);
cc.show();
}catch (Exception e){
e.printStackTrace();
}
}
}
|
通过 HashMap 查找,让 if-else 瞬间去无踪,但是前提还是需要先构建 Map,为了一步到位,决定使用注解方式实现,彻底释放双手。
3.2 实现
- 定义注解
因为可能存在组的概念,所以需要定义一个组名,再定义key用于标记该类,同时可能存在多个不同类型使用同一个类情况,提供一个组存放所有的类型,那么该注解完整如下所示:1
2
3
4
5
6
7
8
9
10
11
12
13
14
15
16
17
18
| @Target(ElementType.TYPE)
@Retention(RetentionPolicy.CLASS)
public @interface MapType {
/**
* 存放组
*/
String group() default Constant.defaultGroup;
/**
* 用于标记的 key
*/
String name() default "";
/**
* 多个 key 共用一个类,可以使用 array 标记
*/
String[] array() default {};
}
|
- 解析注解
新建解析器 MapProcessor,继承 AbstractProcessor
注意:需要在 main 中创建目录 C:\code\AnnotationApp\mapper-compiler\src\main\resources\META-INF\services 并添加注解器声明文件javax.annotation.processing.Processor,内容为自定义的注解器完整类名,如下图。当然可以通过 google 提供的 AutoService 自动生成,依赖为compile group: 'com.google.auto.service', name: 'auto-service', version: '1.0-rc7'

在 process 进行解析,并通过 JavaPoet 去生成上面改造后 map 的静态代码。部分代码如下:
1
2
3
4
5
6
7
8
9
10
11
12
13
14
15
16
17
18
19
20
21
22
23
24
25
26
27
28
29
30
31
32
33
34
35
36
37
38
39
40
41
42
43
44
45
46
47
48
49
50
51
52
53
54
55
56
57
58
59
60
61
62
63
64
65
66
67
68
69
70
71
72
73
74
75
76
77
78
79
80
81
82
83
84
85
86
87
88
89
90
91
92
| @Override
public boolean process(Set<? extends TypeElement> annotations, RoundEnvironment roundEnv) {
if (!annotations.isEmpty()) {
HashMap<String, HashMap<String, ClassName>> map = new HashMap<>();
System.out.println("=========== process start ===========");
for (Element annotatedElement : roundEnv.getElementsAnnotatedWith(MapType.class)) {
if (annotatedElement.getKind() == ElementKind.CLASS) {//只对类的注解进行处理
MapType annotation = annotatedElement.getAnnotation(MapType.class);
String group = annotation.group();
String name = annotation.name();
String[] array = annotation.array();
//空判断,不允许都为空,key 为空字符容易出现覆盖,同时需注意同组同key有覆盖风险!!
if (name.length() == 0 && array.length == 0) {
//写出异常日志
log(Diagnostic.Kind.ERROR, "type name and array are Empty.");
continue;
}
TypeElement typeElement = (TypeElement) annotatedElement;
ClassName className = ClassName.get(typeElement);//获取被注解的类
log("className >> " + className);
//保存入临时 map
HashMap<String, ClassName> items = map.get(group);
if (items == null) {
items = new HashMap<>();
map.put(group, items);
}
if (name.length() > 0) {
items.put(name, className);
}
if (array.length > 0) {
for (String s : array) {
items.put(s, className);
}
}
}
}
//构建静态class文件
try {
ClassName hashMapName = ClassName.get(HashMap.class);
ClassName stringName = ClassName.get(String.class);
ClassName className = ClassName.get(Class.class);
ParameterizedTypeName itemMap = ParameterizedTypeName.get(hashMapName, stringName, className);
ParameterizedTypeName hashMap = ParameterizedTypeName.get(hashMapName, stringName, itemMap);
//创建 HashMap<String,HashMap<String,Class>> map;
FieldSpec fieldMap = FieldSpec.builder(hashMap, "map", Modifier.PUBLIC, Modifier.STATIC)
.initializer("new $T()", hashMap)
.build();
StringBuilder body = new StringBuilder();
CodeBlock.Builder codeBuilder = CodeBlock.builder()
.addStatement("$T item", itemMap);
for (Map.Entry<String, HashMap<String, ClassName>> item : map.entrySet()) {
body.setLength(0);
String group = item.getKey();
System.out.println(" >> group : " + group + " << ");
codeBuilder.addStatement("item = new $T()", itemMap);
for (Map.Entry<String, ClassName> m : item.getValue().entrySet()) {
System.out.println("[ " + m.getKey() + ": " + m.getValue());
body.append("item.put(\"").append(m.getKey()).append("\",").append(m.getValue()).append(".class);\n");
}
codeBuilder.add(body.toString())
.add("map.put(\"").add(group).addStatement("\", item)");
}
//构建静态class为 当前package.TypeMap$Data
TypeSpec.Builder classBuilder = TypeSpec.classBuilder("TypeMap$Data")
.addModifiers(Modifier.PUBLIC, Modifier.FINAL)
.addField(fieldMap)
.addStaticBlock(codeBuilder.build());
JavaFile javaFile = JavaFile.builder(this.getClass().getPackage().getName(), classBuilder.build()).build();
javaFile.writeTo(filer);
} catch (IOException e) {
if (e instanceof FilerException) {
//
} else
e.printStackTrace();
}
System.out.println("========= end =========");
return true;
}
return false;
}
|
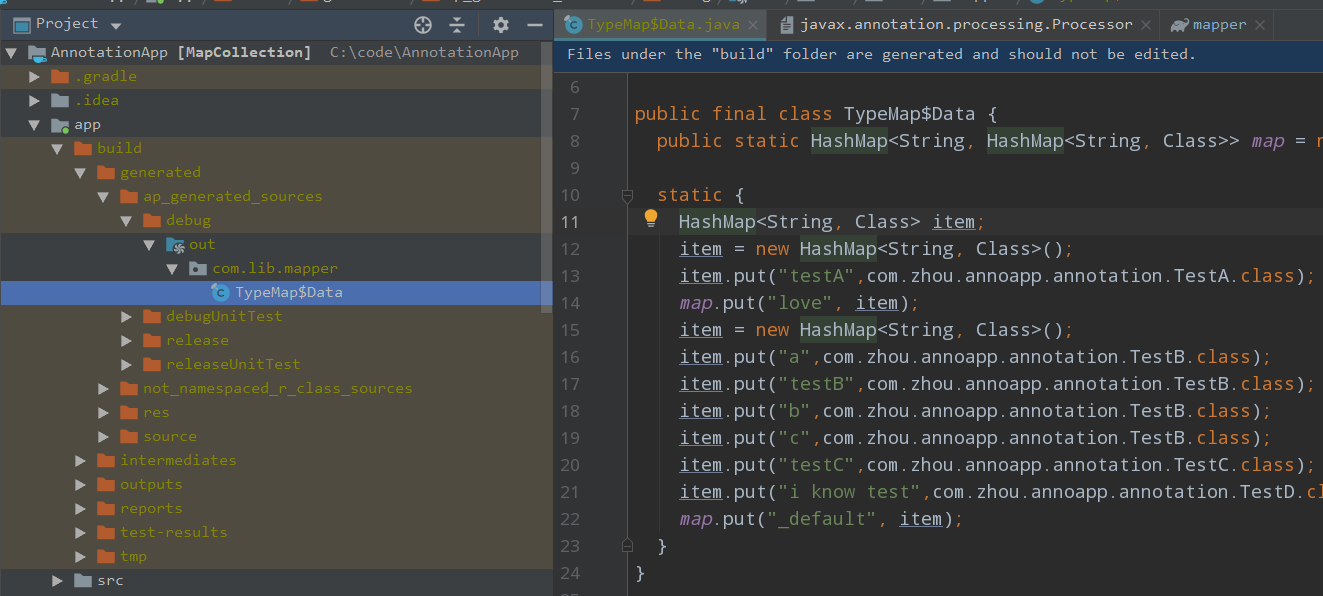
这样,在添加这个注解库后,通过 build 能够动态生成 TypeMap$Data。在android 工程中,生成的目录为 \build\generated\ap_generated_sources\debug\out\com\lib\mapper,内容如下:
3. 对外暴露接口
在 mapper 中,定义静态类,用于链接上面生成的类。
由于 TypeMap$Data 是编译期才生成,如果在没有build之前,直接引用 TypeMap$Data 的成员变量,会报错,有可能导致项目无法构建,所以通过反射方式获取到成员变量,相关代码如下:
1
2
3
4
5
6
7
8
9
10
11
12
13
14
15
16
17
18
19
20
21
22
23
| public class Mapper {
private final static HashMap<String, HashMap<String, Class>> collection;
static {
HashMap<String, HashMap<String, Class>> temp = null;
try {
Class typeMap = Class.forName("com.lib.mapper.TypeMap$Data");
Object instance = typeMap.newInstance();
Field map = typeMap.getField("map");
map.setAccessible(true);
//noinspection unchecked
temp = (HashMap<String, HashMap<String, Class>>) map.get(instance);
} catch (Exception e) {
e.printStackTrace();
temp = new HashMap<>();
} finally {
collection = temp;
}
}
//省略其他
}
|
这样我们注解库编写完成。
4. 使用
android 项目举例
添加依赖:
implementation project(‘:mapper’)
声明注解器依赖:
annotationProcessor project(‘:mapper-compiler’)
如果需要对 kotlin 类注解,先引入 kotlin 相关插件,
再添加 apply plugin:'kotlin-kapt',将 annotationProcessor 替换为 kapt,即 kapt project(':mapper-compiler')
新建类,添加注解:
1
2
3
4
5
6
7
8
9
10
11
12
13
14
15
16
17
18
19
20
| @MapType(name = "testA", group = "love")
public class TestA {
public TestA() {
System.out.println(getClass().getName());
}
}
@MapType(name = "testB", array = {"a", "b", "c"})
public class TestB {
public TestB() {
System.out.println(getClass().getName());
}
}
@MapType(name = "testC")
public class TestC {
public TestC() {
System.out.println(getClass().getName());
}
}
|
业务类中使用:
1
2
3
4
| private void function(){
Class a = Mapper.findItem("testA");
//具体逻辑,需做空判断
}
|
5. 提交私仓 maven
为了方便其他项目使用,我们可以把库提交到私仓,这里已假设存在私仓 maven。
5.1 添加上传脚本
在两个 java-library 库均添加 maven 插件,并增加上传脚本,代码块如下:
1
2
3
4
5
6
7
8
9
10
11
12
13
14
15
16
17
18
| apply plugin: 'maven'
uploadArchives {
repositories {
mavenDeployer {
repository(url: MAVEN_URL) {
authentication(userName: USER_NAME, password: USER_PASSWORD)
}
pom.project {
groupId GROUP_ID//定义的组
artifactId 'mapper-annotation'//库唯一标识
version '1.0.0'//版本
packaging 'jar'//打包类型
description 'mapper-annotation'
}
}
}
}
|
两个库配置相似,区别在 artifactId 和 description 不同,版本号每次上传都需要改变。
特别注意,上传jar不要用 SNAPSHOT 标识,每次上传都需要修改版本,相同版本无法覆盖!!如果使用,即使提示上传成功,你在引用的时候除非指定到特定版本,如 implementation 'com.lib:mapper-annotation:1.0.1-20200711.111827-1',否则不能准确获取最新的版本!
配置不需要增加什么 task sourceJar,除非你完全理解 gradle task,否则有可能出现无法理解问题
当然,mapper 库也需要提交,增加配置如下:
1
2
3
4
5
6
7
8
9
10
11
12
13
14
15
16
17
18
19
20
21
22
23
24
25
26
27
28
29
30
| apply plugin: 'maven'
task sourcesJar(type: Jar) {
baseName "mapper"
//分类器,用于区别其他jar包
classifier "sources"
//从main源集中的所有代码
from android.sourceSets.main.java.srcDirs
}
artifacts {
archives sourcesJar
}
uploadArchives {
repositories {
mavenDeployer {
repository(url: MAVEN_URL) {
authentication(userName: USER_NAME, password: USER_PASSWORD)
}
pom.project {
groupId GROUP_ID
artifactId 'mapper'
version '1.0.0'
packaging 'aar'
description 'mapper'
}
}
}
}
|
5.2 修改依赖
- mapper-annotation 库
因为 mapper 和 mapper-compiler 均依赖注解
- 注解器 mapper-compiler
修改依赖注解为线上版本
- 对外库 mapper
修改依赖注解为线上版本
5.3 上传
打开 idea gradle 控制面板,在 upload 中逐个上传。
在其他需要的项目中,添加 mapper 依赖,增加注解器即可。
项目地址,点我查阅